STEEL TILE CIRCULAR, FLAT, SQUARE DOWN, OCTAGON, PERFORATED TYPE

- >
- Products
- >
- STEEL TILE CIRCULAR, FLAT, SQUARE DOWN, OCTAGON, PERFORATED TYPE
STEEL TILE CIRCULAR, FLAT, SQUARE DOWN, OCTAGON, PERFORATED TYPE
Tile system is a system manufactured by metallic module such as Al Steel etc. of certain dimension. It is possible to have variety of patterns and colors and by virtue of its excellent durability and moisture-proofness and workability it is mainly used for airport, lobby and canopy etc.
- Product outline
- Product drawing
- Information for construction
- Miscellaneous
(1) Definition of terms① System: AL-Tile System② Method of construction: CLIP-IN (A type for inserting tile to Clip-bar)(2) Transportation and handling① Transportation: After recording type, name, dimension and manufacturing date etc. on label and packing and then transport it.② Handle it in consideration of instruction of manufacturer and requirement of users.
Product of Al Tile System
(1) Material
- ① Quality of material: KSD 7081 (colored metallic ceiling material for construction)
KSD 3609 (steel material support member for construction)
(2) Dimension
- ① HANGER BOLT : ψ9mm
- ② HANGER & PIN : 105mm X 20mm X 2.0T
- ③ HANGER NUT : ψ9mm
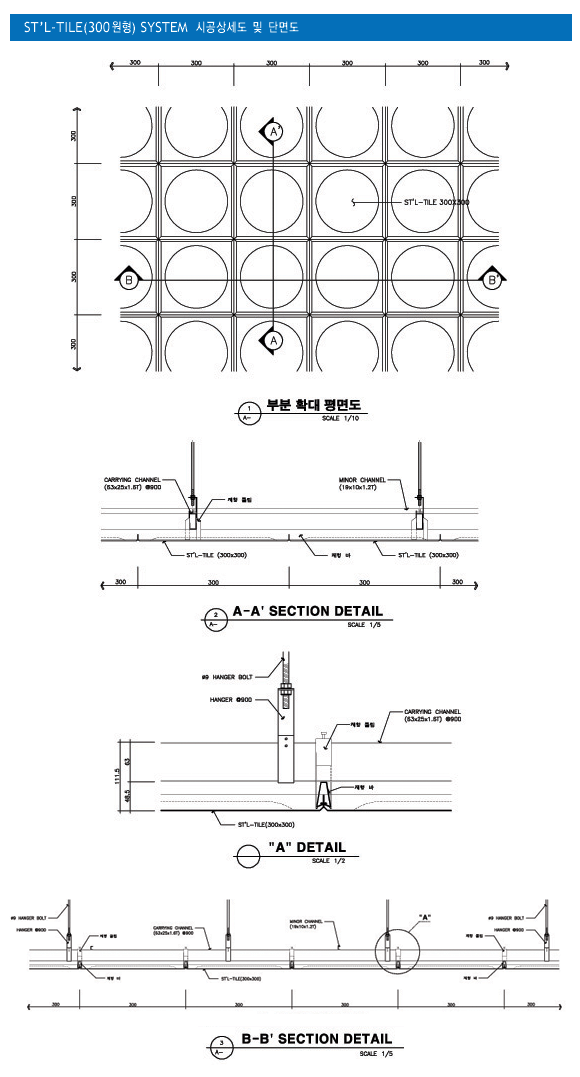
- ④ CARRYING CHANNEL : 38mm X 12mm X 1.2T
- ⑤ C/C JOINT : 100mm X 35mm X 10mm X 1.0T
- ⑥ MINOR CHANNEL : 19mm X 10mm X 1.2T
- ⑦ M/C CLIP : 38mm X 23mm X 14mm X 1.2T
- ⑧ Trapezoid Clip-bar
- ⑨ Trapezoid Clip-bar, Clip
- ⑩ Steel tile : Site drawing shall be referred to for tile size and type.
Special feature of Al Tile System
- * It is cell face ceiling material.
- * It is possible to use at very moist places such as swimming pools etc.
- * Its color is beautiful and diverse.
- * It has excellent acoustic effect by punched holes and insertion of sound absorption tex at backside.
- * It is suitable to narrow space for its small size module.
(1) Setting up centerline of building: After accurate measurement of ceiling surface set up centerline after checking other work schedule such as lightline and position of diffuser etc.
(2) Strong anchor work
- ① At the time of strong anchor work when centerline is set up mark part for fixing strong anchor (Ф9mm) at slab surface and punch hole with drill and fix it.
- ② At the time of work for cash iron insert (Ф9 mm) install it at form according to drawing.
- ③ Caution: Pay attention to intervals between anchor and insert and right angle.
- ④ It is ideal to make interval for installation as @900∼ 1,200 mm for strong anchor or insert in consideration of direction of installation of carrying channel.
(3) Molding line level check
- ① Use of water level or level
- a. Confirming position by means of drawing (confirming height of ceiling)
- b. Confirming the position by water level and ink pot string marking between positions.
- ② Set the height of wall molding to be higher than height of T-bar by 9.5 mm.
- ③ Caution: At the time of using water check make sure to check level after checking any presence of air bubble in hose and breaking of hose.
(4) Attachment of wall molding (using after painting angle or sea gull molding)
- ① Attach molding along the India ink line and fix wall molding by using 1" concrete nail. (interval: 500∼1,000 mm)
- ② Be careful not to slacken the height and interval between moldings.
- ③ In connection with facilities such as curtain box it shall be attached according to specification.
(5) Installation of hanger bolt
- ① Upper part of hanger bolt is fixed to strong anchor or insert and lower part of bolt is fixed hanger and nut in consideration of ceiling height.
- ② At the place where installation duct or other obstacles are work shall be carried out after reinforcement according to drawing and specification.
(6) Installation of lightline
- Install lightline according to specification but it is required to have consultation with persons in charge of electricity and facility.
(7) Installation of carrying channel
- After tying hanger set and carrying channel and fix them. Install it at an interval of @900∼1,200 mm. Connect the connecting part of carrying channel by means of carrying joint.
- And make sure to install carrying channel not to be off from box face by more than 30 cm.
(8) Installation of MINOR Channel
- When area of work is broad reinforce and fix above the installed carrying channel with reinforcing channel (minor channel) and install it at an interval of 2,000 ∼3,000 mm.
(9) Installation of CLIP BAR
- ① After placing string at centerline of the work then install sturdily CLIP-BAR by using WIRE CLIP by matching it to lightline and in a right angle direction toward carrying channel.
- ② Intervals of installation shall comply with drawing according to each type (size of tile plate).(at an interval of @300 or @600 mm usually)
- ③ Level of installed ceiling shall be accurately set by water level or level device and by using hanger bolt and nut.
(10) Installation of finishing plate (AL TILE)
- ① To groove of CLIP BAR insert the part of embossing of AL Tile.
- ② At the time of installation make sure to maintain straightness of the line.
- ③ Prohibit using finishing plate which has scratch, broken corners or dirtied.
(11) Installation of curtain box
- ① Manufacturing and installing products suitable to use according to specification (separate painting)
- ② Welding work is carried out concurrently therefore install work bench to enable safety in work and working in comfortable stance.